Menu

all about electronic and microcontrollers
Showing posts with label ducu. Show all posts

Saturday, November 17, 2018

DHT22 & LCD Shield

In this article I will describe to you, how to develop a home weather station using the DHT22 temperature/humidity sensor.

TECHNICAL DETAILS
Model:
Power supply:
DHT22
3.3-6V DC (2.5mA max current use during conversion (while requesting data))
Output signal:
Digital signal via single-bus
Sensing element:
Polymer capacitor
Operating range:
Humidity: 0-100%RH;
Temperature: -40~80Celsius
Accuracy:
Humidity +-2%RH(Max +-5%RH);
Temperature <+-0.5 Celsius
Resolution or sensitivity:
Humidity 0.1%RH;
Temperature 0.1Celsius
Repeatability:
Humidity +-1%RH;
Temperature+-0.2Celsius
Humidity hysteresis:
+-0.3%RH
Long-term Stability:
+-0.5%RH/year
Sensing period:
Average: 2s
Interchangeability:
fully interchangeable
Dimensions:
Small size 14*18*5.5mm;
Big size 22*28*5mm
Weight (just the DHT22):
2.4g

Hardware setup:
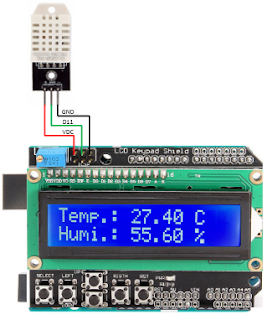
The development board used for this experiment will be the Arduino UNO and the measured values will be displayed on 1602 LCD Keypad Shield board.

DHT22 is a low-cost digital temperature and humidity sensor. It uses a capacitive humidity sensor and a thermistor to measure the surrounding air, and generate out a digital signal on the data pin (which means no analog input pins needed). It's fairly simple to use, but requires careful timing to collect data. The only real downside of this sensor is you can only get new data from it once every 2 seconds, so when using DHT22 library, sensor readings can be up to 2 seconds old.

Simply connect the first pin on the left to 3-5V power, the second pin to your data input pin and the rightmost pin to ground. Although it uses a single-wire to send data it is not Dallas One Wire compatible! If you want multiple sensors, each one must have its own data pin.

In my particular case 1602 LCD Keypad Shield ICSP connector (VCC, D11, GND) was the easiest way to connect my DHT22 sensor. Keypad functionality wouldn’t be used on this article.


Some pictures from the surgery.


On below video we can see the Arduino UNO board in action.


Software:
The program is written in Arduino IDE software (version v1.8.7).

Libraries used:

Below is presented the software approach for this project:

/*
'*******************************************************************************
'  Project name: DHT22 & LCD Shield
'  Description:
'   In this experiment i will describe to you, how to develop a home weather 
'   station using the DHT22 temperature/humidity sensor.       
'   Temperature will be displayed in Celsius Degree and the Umidity in percent
'   The delay between two consecutive reads is set to about 2.1 seconds.
'          Ex. of viewing display: 
'               ________________                         
'              |TEMP.: 24.60 C  |     
'              |Humy.: 54.40 %__|
'
'   Hardware configuration is:
'             DHS22 is connected to 1602 LCD Keypad Shield ICSP connector (vdc, d11,gnd).
'             The 1602 LCD Keypad Shield board is inserted into Arduino UNO standard connectors.
'
'  Written by:
'          Aureliu Raducu Macovei, 2018 (www.electronicexperiments.blogspot.com).
'
'  Test configuration:
'    MCU:                        ATmega328P;
'    Test.Board:                 Arduino UNO;
'    SW:                         Arduino IDE software (version v1.8.7);
'                                DHT Library from Arduino official website:
'                                https://playground.arduino.cc/Main/DHTLib
'*******************************************************************************
 */
 
#include LiquidCrystal.h // includes the LiquidCrystal Library
#include DHT22.h         // includes the DHT22 Library

#define DHT22_PIN 11

// Setup a DHT22 instance
DHT22 myDHT22(DHT22_PIN);

// initialize the library by associating any needed LCD interface pin
// with the arduino pin number it is connected to
const int rs = 8, en = 9, d4 = 4, d5 = 5, d6 = 6, d7 = 7;
LiquidCrystal lcd(rs, en, d4, d5, d6, d7);

void setup() {
  // set up the LCD's number of columns and rows:
  lcd.begin(16, 2);
  lcd.setCursor(0,0);
  lcd.print("    -DHT22 &-   ");
  lcd.setCursor(0,1);
  lcd.print("  --LCD 2x16--  ");
  delay(5000);
  lcd.setCursor(0,0);
  lcd.print("                ");
  delay(100);
  lcd.setCursor(0,1);
  lcd.print("                ");
  delay(500);
}

void loop(void)
{ 
  DHT22_ERROR_t errorCode;
  // The sensor can only be read from every 1-2s, and requires a minimum
  // 2s warm-up after power-on.
  delay(2100);

  errorCode = myDHT22.readData();
  switch(errorCode)
  {
    case DHT_ERROR_NONE:
      lcd.setCursor(0,0);     // Set the first row (location at which subsequent text written to the LCD will be displayed)
      lcd.print("Temp.: ");   // Print "Temp.:" on the LCD
      lcd.print(myDHT22.getTemperatureC());     // Print string temperature
      lcd.print(" C");                          // Prints "C" on the LCD
      lcd.setCursor(0,1);     // Set the second row (location at which subsequent text written to the LCD will be displayed)
      lcd.print("Humi.: ");   // Print "Humi.:" on the LCD
      lcd.print(myDHT22.getHumidity());         // Print string humidity
      lcd.print(" %");        // Prints "%" on the LCD
      break;
    case DHT_ERROR_CHECKSUM:
      lcd.print("check sum error ");
      lcd.print(myDHT22.getTemperatureC());
      lcd.print("C ");
      lcd.print(myDHT22.getHumidity());
       lcd.println("%");
      break;
    case DHT_BUS_HUNG:
      lcd.println("BUS Hung ");
      break;
    case DHT_ERROR_NOT_PRESENT:
      lcd.println("Not Present ");
      break;
    case DHT_ERROR_ACK_TOO_LONG:
      lcd.println("ACK time out ");
      break;
    case DHT_ERROR_SYNC_TIMEOUT:
      lcd.println("Sync Timeout ");
      break;
    case DHT_ERROR_DATA_TIMEOUT:
      lcd.println("Data Timeout ");
      break;
    case DHT_ERROR_TOOQUICK:
      lcd.println("Polled to quick ");
      break;
  }
}

Monday, August 8, 2011

Distance Sensor Sharp 2YOA21 & LCD

The distance sensor produced by Sharp is a popular and relatively low cost solution for measuring distance. The sensor can be used also for measuring the rightness or color (in very limited extent) but in this article we will talk only about measuring distances.
In the current experiment we will use the 2YOA21 model and the characteristics of this sensor are:
  1. Minimum Measuring Distance = 10cm;
  2. Maximum Measuring Distance = 80cm;
  3. Infrared Proximity Sensor;
  4. Analog output inversely proportional to distance;
  5. Sensor is Ratiometric;
  6. Operating Supply Voltage = 4.5V to 5.5V;
  7. Average Supply Current – Typical = 30mA;
  8. Response Time = 38 ± 10ms.
Obviously there are several versions of sensors which are capable to measure distances shorter or longer, depending on needs.
Examples of sensors are:
  • Sharp Distance Sensor GP2D120 (4-30cm);
  • Sharp Distance Sensor GP2Y0A21 (10-80cm);
  • Sharp Distance Sensor GP2Y0A02 (20-150cm).
The data signal of sensor 2YOA21 are sent in analog way and the connection made with the microcontroller is very simple. The analog output varies from 3.1V at 10cm to 0.3V at 80cm.

Hardware setup:
In the current article I intend to display the measured distance, between sensor and some object, on the LCD with 2x16 characters.
Physical realization is carried out on the breadboard with 2420 dots.


Trough this video I would like to share the situation in real time.


Now, I will share a little bit of theory, theory needed to put things in motion.

Below I present the timing diagram for data signal transmitted on pin 1 of the sensor 2YOA21.

Timing diagram.

The following diagrams are very useful when we want to construct the formula for measuring distance.

The distance vs. output voltage.

Above we have the diagram that specify the relationship between the distance measured and the output voltage of 2YOA21 sensor.
The output voltage vs. inverse number of the distance.

Above we have the diagram that specify the relationship between the output voltage and the inverse number of distance sensor 2YOA21.

Pin description of 2YOA21 distance sensor.

Pinout.

Below we have the diagram block of 2YOA21 distance sensor.

Block diagram.

In the datasheet, the manufacturer recommend us how to align properly, the distance sensor by the measured surface.
Below I will present you trough two pictures how to do that.

Proper Alignment to Surface Being Measured

Proper Alignment to Moving Surfaces.

Notes:
Before we put the toy in operation we must take into consideration the following tips:
  • Must be kept the sensor lens clean. The dust, water, oil, and other contaminants can deteriorate the characteristics of this device;
  • When using a protective cover over the emitter and detector, ensure the cover efficiently transmits light throughout the wavelength range of the LED (λ = 850 nm ± 70 nm). Both sides of the protective cover should be highly polished;
  • Objects in proximity to the sensor may cause reflections that can affect the operation of the sensor;
  • Sources of high ambient light (the sun or strong artificial light) may affect measurement. For best results, the application should be designed to prevent interference from direct sunlight or artificial light;
  • Using the sensor with a mirror can induce measurement errors. Often, changing the incident angle on the mirror can correct this problem;
  • The manufacturer recommends a 10 μF (or larger) bypass capacitor between VCC and GND near the sensor.
For more details, please study the Sharp 2Y0A21YK datasheet.

Circuit Diagram:
Difficulty level of the electronic scheme, is low. The microcontroller used is PIC16F876A because he posses the analog to digital converter, conversion required for the signal processing collected from our distance sensor.
S1 is the master reset button, R1 is the resistor of pull-up button.
Cristal quartz by 8 MHz, is used.
C3 and C4 are used for additional filtering of the sensor 2YOA21.
Trough J1 we ensure the connectivity with distance sensor.
ICSP connector is used to program the microcontroller.
Trough R2 we can adjust the contrast for LCD with 2x16 characters.
R3 adjusts the current through the LED LCD (light intensity of it).

The electronic schematic.

The electronic scheme is built in Eagle Cad, free version.

Software:
The program is written in mikroC Pro for PIC 2011 (version v4.60).
Until this moment, I found 3 ways to extract the formula that converts the sensor output voltage in the distance. I will show below:
  1. Based on "typical values" from Sharp, the formula to translate sensor value into distance (the formula is only valid for a sensor value between 80 to 500) is:
  2. Analyzing the diagrams below we can deduce:

    Calibration curves of 2YOA21 sensor.

    This equation was derived from the calibration curve:


    where “IR Value” is the digital output signal from the sensor.
    The curve was created by plotting output values of the IR sensor versus distances to a stationary, flat object.

    Here is the diagram of 2YOA21 sensor values at ranges between 0cm and 150cm:

    Sharp Sensor Data.

  3. And now I will present the formula used in the current article.
    As I said above, the analog voltage is the inverse of distance, so distance can be calculated as:

    then scaled to suit with the datasheet.
    We will load ADC value in 16 bit “math” variable and we will use in this way:

    for scaling, 6050 is a constant.
All three methods are tested by me, so you can have confidence in their accuracy. I chose the latter method because it seemed more interesting, nothing more.
For those who are extremely pretentious can develop a look-up table from data points supplied from the graph, but if you choose this route should be considered the RAM memory of microcontroller, must be big enough to host the entire data table.

Below is my software version:
/*
'*******************************************************************************
'  Project name: Distance Sensor Sharp 2YOA21 & LCD Display
'  Description:
'          In this experiment we will try to display on LCD 2x16 character, 
'          distance helped by IR senzor "Sharp 2Y0A21YK" wich is able to give
'          distance betwen 10cm~80cm.
'  Written by:
'          Aureliu Raducu Macovei, 2011.
'  Test configuration:
'    MCU:                        PIC16F876A;
'    Test.Board:                 WB-106 Breadboard 2420 dots;
'    SW:                         MikroC PRO for PIC 2011 (version v4.60);
'  Configuration Word:
'    Oscillator:                 HS (8Mhz)on pins 9 and 10;
'    Watchdog Timer:             OFF;
'    Power up Timer:             OFF;
'    Browun Out Detect:          ON;
'    Low Voltage Program:        Disabled;
'    Data EE Read Protect:       OFF;
'    Flash Program Write:        Write Protection OFF;
'    Background Debug:           Disabled;
'    Code Protect:               OFF
'*******************************************************************************
*/

// LCD module connections;
sbit LCD_RS at RB0_bit;
sbit LCD_EN at RB1_bit;
sbit LCD_D4 at RB4_bit;
sbit LCD_D5 at RB5_bit;
sbit LCD_D6 at RB6_bit;
sbit LCD_D7 at RB7_bit;

sbit LCD_RS_Direction at TRISB0_bit;
sbit LCD_EN_Direction at TRISB1_bit;
sbit LCD_D4_Direction at TRISB4_bit;
sbit LCD_D5_Direction at TRISB5_bit;
sbit LCD_D6_Direction at TRISB6_bit;
sbit LCD_D7_Direction at TRISB7_bit;
// End LCD module connections;

unsigned int cm,cm10;
unsigned int math;
char *text;
char *digit = "00";

void calc_distance(void)
{
 // from the datasheet the analog voltage is
 // the inverse of distance, so distance can be calculated
 // d = (1 / volts) then just scaled to suit the datasheet
 // load ADC value in 16bit math variable.
 math = ADC_Read(0);
 math = ADRESH;
 math = (math * 255);
 math += ADRESL;
 // now invert it; (1 / volts) use (6050 / volts) for scaling, 6050 is a constant;
 math = (6050 / math);
 if(math >= 2) math -= 2;   // fix linear error (-2)
 if(math < 10) math = 10;   // min limit at 10cm
 if(math > 80) math = 80;   // max limit at 80cm
 // convert from 0-99 to 2 decimal digits, 0-99cm
 cm10=0;
 while(math >= 10)
 {
  cm10++;
  math -= 10;
  }
 cm = math;
}

void main(void)
{
 ADCON0 = 0X01;              // RA0 as Analog Input;
 ADCON1 = 0X0E;              // Reference VDD and VSS, with left justified;

 CMCON |=7;                  // Disable comparator;

 TRISA0_bit = 1;             // Make RA0 as input;
 PORTA = 0x00;               // Initial value of PORTA;

 LCD_Init();                 // Initialize the LCD;
 LCD_Cmd(_LCD_CURSOR_OFF);   // Cursor mode off;
 LCD_Cmd(_LCD_CLEAR);        // Clear the entire LCD;

 text = "Sharp 2Y0A21";
 LCD_Out(1,3,text);
 text = "Distance:";
 LCD_Out(2,1,text);
 text = "cm";
 LCD_Out(2,13,text);

 while(1)
 {
  calc_distance();            // Call the "calc_distance" function;

  digit[0] = cm10 + 48;       // tens digit;
  digit[1] = cm +48;          // unit digit;
  Lcd_Out(2,10,digit);        // display on LCD from column 2, from character 10;
  delay_ms(100);
 }
}

Sunday, July 24, 2011

Dot Matrix Led 8x8 & MAX 7219

In this article we will discuss about functions of MAX 7219, created by the Maxim company. This IC (Integrated Circuit) could help as, when we whant to work with digits and LEDs.
At the designing of this IC,was wanted fulfillment of the following functions:
  • Control of eight digits, made ​​with LED technology;
  • Common cathode configuration;
  • Communication via SPI, with a slew-rate limited on the segment driver, to reduce EMI (Electromagnetic Interference).
Of course Max7219 may be used for handling an matrix of LEDs, up to 8x8 resolution, bar-graph displays or control up to 64 LEDs, individually.
Included on-chip are a BCD code-B decoder, multiplex scan circuitry, segment and digit drivers, and an 8x8 static RAM that stores each digit. Only one external resistor is required to set the segment current for all LEDs.

Hardware setup:
Physical realization is carried out on the breadboard with 2420 dots. The example made ​​by me can be studied below.

Electronic scheme, in action.

Trough video below I whant to demonstrate that things can be put in motion.


In a dot led matrix display, multiple LEDs are connected together in row and columns. This connection is established to reduce the number of pins needed to manipulate them.
In the current article we will use a 8x8 LED matrix, which would require 64-pin I/O, one for each pixel.
Connecting all the anodes together (from R1 to R8) and cathodes in column (from C1 to C8), the required number of I/O pins, is reduced to 16. Each LED is accessed by its row and column number.
In the figure below, if R5 is in in 1 logic and C3 is in 0 logic, the LED on line 5 column 3 will be turned on.
The characters will be displayed by fast scanning of each row and column.

Dot Matrix Led 8x8
The structure of dot matrix LED 8x8.

The table below shows the logic levels, which are applied to rows and columns, to display the character "X". At the bottom of the table we have the hex code for it.

The logic levels
Logical level of 8x8 matrix.

The image above shows pins connections for my dot matrix led 8x8.

Serial-Data Format (16 Bits):

Serial-Data Format

For the MAX7219, serial data at DIN, sent in 16-bit packets, is shifted into the internal 16-bit shift register with each rising edge of CLK regardless of the state of
LOAD. For the MAX7221, CS must be low to clock data in or out. The data is then latched into either the digit or control registers on the rising edge of LOAD/CS.
LOAD/CS must go high concurrently with or after the 16th rising clock edge, but before the next rising clock edge or data will be lost. Data at DIN is propagated
through the shift register and appears at DOUT 16.5 clock cycles later. Data is clocked out on the falling edge of CLK. Data bits are labeled D0–D15 (picture from above). D8–D11 contain the register address. D0–D7 contain the data, and D12–D15 are “don’t care” bits. The first received is D15, the most significant bit (MSB).

Register Address Map:

Address Map

For more details, please study the MAX7219 datasheet.

Circuit Diagram:
Difficulty level of the electronic scheme, is low. Microcontroller used in the current project is PIC16F876A, this MCU supports SPI communication.
S1 is the master reset button, R3 is the resistor of pull-up button.
Cristal quartz by 8 MHz, is used.
R1 represent the pull-up resistor for "LOAD/CS".
R2 adjusts the current on the segment, for all digits.
Our matrix LED 8x8 is in common catode configuration.

Electronic Schematic
The electronic schematic.

The electronic scheme is built in Eagle Cad, free version:

Software:
The program is written in mikroC Pro for PIC 2011 (version v4.60). To store the entire alphabet and symbols, the column 0 and 7 are not used, in case you opt for a microcontroller with more RAM, you can add columns 0 and 7 and you will enjoy the entire matrix.
/*
'*******************************************************************************
'  Project name: PIC16F876A & MAX7219 For 8x8 LED Display
'  Description:
'          Trough the current experiment we wish to succed the next task:
'          Display on 8x8 Led matrix, the alphabet. The sequence between letters,
'          will have one second delay.
'  Written by:
'          Mark &
'          Aureliu Raducu Macovei, 2011.
'  Test configuration:
'    MCU:                        PIC16F876A;
'    Test.Board:                 WB-106 Breadboard 2420 dots;
'    SW:                         MikroC PRO for PIC 2011 (version v4.60);
'  Configuration Word:
'    Oscillator:                 HS (8Mhz)on pins 9 and 10;
'    Watchdog Timer:             OFF;
'    Power up Timer:             OFF;
'    Browun Out Detect:          ON;
'    Low Voltage Program:        Disabled;
'    Data EE Read Protect:       OFF;
'    Flash Program Write:        Write Protection OFF;
'    Background Debug:           Disabled;
'    Code Protect:               OFF
'*******************************************************************************
*/

// For more space, we don't need byte 0 and byte 7.
// We have stripped them out, if/when we have a need and a bigger PIC,
// then we can put them back if we want.

// Here we define row values for each of the six columns corresponding to the
// Alphabet, from  A through Z.
unsigned const short Alphabet[156]={
                                     0x7f, 0x88, 0x88, 0x88, 0x88, 0x7f,  // A
                                     0xff, 0x91, 0x91, 0x91, 0x91, 0x6e,  // B
                                     0x7e, 0x81, 0x81, 0x81, 0x81, 0x42,  // C
                                     0xff, 0x81, 0x81, 0x81, 0x81, 0x7e,  // D
                                     0x81, 0xff, 0x91, 0x91, 0x91, 0x91,  // E
                                     0x81, 0xff, 0x91, 0x90, 0x90, 0x80,  // F
                                     0x7e, 0x81, 0x81, 0x89, 0x89, 0x4e,  // G
                                     0xff, 0x10, 0x10, 0x10, 0x10, 0xff,  // H
                                     0x00, 0x81, 0xff, 0xff, 0x81, 0x00,  // I
                                     0x06, 0x01, 0x81, 0xfe, 0x80, 0x00,  // J
                                     0x81, 0xff, 0x99, 0x24, 0xc3, 0x81,  // K
                                     0x81, 0xff, 0x81, 0x01, 0x01, 0x03,  // L
                                     0xff, 0x60, 0x18, 0x18, 0x60, 0xff,  // M
                                     0xff, 0x60, 0x10, 0x08, 0x06, 0xff,  // N
                                     0x7e, 0x81, 0x81, 0x81, 0x81, 0x7e,  // O
                                     0x81, 0xff, 0x89, 0x88, 0x88, 0x70,  // P
                                     0x7e, 0x81, 0x85, 0x89, 0x87, 0x7e,  // Q
                                     0xff, 0x98, 0x98, 0x94, 0x93, 0x61,  // R
                                     0x62, 0x91, 0x91, 0x91, 0x91, 0x4e,  // S
                                     0xc0, 0x81, 0xff, 0xff, 0x81, 0xc0,  // T
                                     0xfe, 0x01, 0x01, 0x01, 0x01, 0xfe,  // U
                                     0xfc, 0x02, 0x01, 0x01, 0x02, 0xfc,  // V
                                     0xff, 0x02, 0x04, 0x04, 0x02, 0xff,  // W
                                     0xc3, 0x24, 0x18, 0x18, 0x24, 0xc3,  // X
                                     0xc0, 0x20, 0x1f, 0x1f, 0x20, 0xc0,  // Y
                                     0xc3, 0x85, 0x89, 0x91, 0xa1, 0xc3,  // Z
                                     };

 unsigned const short Symbols[114]={
                                    0x00, 0x3c, 0x42, 0x81, 0x00, 0x00,   // (
                                    0x00, 0x00, 0x81, 0x42, 0x3c, 0x00,   // )
                                    0x00, 0x00, 0xff, 0x81, 0x00, 0x00,   // [
                                    0x00, 0x00, 0x81, 0xff, 0x00, 0x00,   // ]
                                    0x00, 0x18, 0xe7, 0x81, 0x00, 0x00,   // {
                                    0x00, 0x00, 0x81, 0xe7, 0x18, 0x00,   // }
                                    0x00, 0x18, 0x24, 0x42, 0x81, 0x00,   // <
                                    0x00, 0x81, 0x42, 0x24, 0x18, 0x00,   // >
                                    0x00, 0x03, 0x0c, 0x30, 0xc0, 0x00,   // /
                                    0x00, 0xc0, 0x30, 0x0c, 0x03, 0x00,   // \
                                    0x00, 0x00, 0x00, 0x00, 0x00, 0x00,   //
                                    0x00, 0x00, 0xfd, 0xfd, 0x00, 0x00,   // !
                                    0x60, 0x80, 0x8d, 0x8d, 0x90, 0x60,   // ?
                                    0x42, 0x24, 0xff, 0xff, 0x24, 0x42,   // *
                                    0x24, 0xff, 0x24, 0x24, 0xff, 0x24,   // #
                                    0x62, 0x91, 0xff, 0xff, 0x91, 0x4e,   // $
                                    0x66, 0x99, 0x99, 0x66, 0x09, 0x00,   // &
                                    0x42, 0xa4, 0x48, 0x12, 0x25, 0x42,   // %
                                    0x20, 0x3f, 0x20, 0x20, 0x3e, 0x21,   // pi
                                    };

// Serial 8x8 Matrix Display connections.
sbit Chip_Select at RC0_bit;
sbit Chip_Select_Direction at TRISC0_bit;
// End Serial 8x8 Matrix Display connections.

// Here we set the configuration of max7219.
void max7219_init1()
{
Chip_Select = 0;       // SELECT MAX
SPI1_write(0x09);      // BCD mode for digit decoding
SPI1_write(0x00);
Chip_Select = 1;       // DESELECT MAX

Chip_Select = 0;       // SELECT MAX
SPI1_write(0x0A);
SPI1_write(0x0F);      // Segment luminosity intensity
Chip_Select = 1;       // DESELECT MAX

Chip_Select = 0;       // SELECT MAX
SPI1_write(0x0B);
SPI1_write(0x07);      // Display refresh
Chip_Select = 1;       // DESELECT MAX

Chip_Select = 0;       // SELECT MAX
SPI1_write(0x0C);
SPI1_write(0x01);      // Turn on the display
Chip_Select = 1;       // DESELECT MAX

Chip_Select = 0;       // SELECT MAX
SPI1_write(0x00);
SPI1_write(0xFF);      // No test
Chip_Select = 1;       // DESELECT MAX
}

// This is write Byte function.
void Write_Byte(unsigned short myColumn, unsigned short myValue)
{
 Chip_Select = 0;       // select max7219.
 SPI1_write(myColumn);  // send myColumn value to max7219 (digit place).
 SPI1_write(myValue);   // send myValue value to max7219 (digit place).
 Chip_Select = 1;       // deselect max7219.
 }

// This is clear matrix function.
void Clear_Matrix(void)
{
unsigned short x;

for(x=1;x<9;x++)
{
  Write_Byte(x,0x00);
  }
}

void Write_Char(char myChar)
{
unsigned short Column, Start_Byte;
// We will use only uppercase characters, so we will start from 65
// (look at the ascii chart), with an offset of 6, becouse we are using only 6
// bytes for each character.

// Clear the display first.
Clear_Matrix();

// The next line defines our byte, from which to start the array.
Start_Byte = (myChar - 65) * 6;     // 65 represents the letter "A" in ASCII code.

// We are using only columns from 2 through 7 for displaying the character.
for(Column=2;Column<8;Column++)
{
  Write_Byte(Column, Alphabet[Start_Byte++]);
  }
}

// This is write char function.
void Write_Symbol(char mysymbols)
{
unsigned short Column1, Start_Byte1;
// We will use only uppercase characters, so we will start from 65
// (look at the ascii chart), with an offset of 6, becouse we are using only 6
// bytes for each character.

// Clear the display first.
Clear_Matrix();

// The next line defines our byte, from which to start the array.
Start_Byte1 = (mysymbols-0) * 6 ;

// We are using only columns from 2 through 7 for displaying the character.
for(Column1=2;Column1<8;Column1++)
{
  Write_Byte(Column1, Symbols[Start_Byte1++]);
  }
}

// Here we have the main function.
void main()
{
unsigned int x,y;

Chip_Select_Direction = 0;    // Set RC0 pin as output.
SPI1_init();                  // Initialize SPI1 module.

max7219_init1();              // initialize  max7219.

do                            // infinite loop.
{
  // You can write the characters this way, one at a time.

  /*
  Write_Char('R');
  Delay_ms(1000);
  Write_Char('A');
  Delay_ms(1000);
  Write_Char('D');
  Delay_ms(1000);
  Write_Char('U');
  Delay_ms(1000);
  */
  // or

 for(x=65;x<=90;x++)    // Increment with 1, from 65 until 90.
  {
   Write_Char(x);
   Delay_ms(1000);      // This is our delay, between two consecutive character.
   }

  Clear_Matrix();       // Clear the Matrix display;
  delay_ms(500);

  for(y=0;y<=18;y++)
  {
   Write_Symbol(y);     // This is our delay, between two consecutive character.
   Delay_ms(1000);
   }

  }while(1);            // do forever.
}